
Yup he's walking. After all those weeks in spidey bootcamp and he's finally got the message.
In the end we pretty much merged what i was doing with the front legs with what Sarah was doing with the back legs, we've shown it to Dan Dalli and he's given it the thumbs up.
We've also divided up the animatic between the two of us so over the next week or so we'll be doing all the animation.
Enjoy.
Sunday, 30 November 2008
Wednesday, 26 November 2008
back leg ahoy!
Yep, this video only concentrates on the back leg motion so please ignoring the spasms in the front, just a quick playblast to show matt my idea.
Limitations
Dunno how much more i'm gonna get out of this walk cycle, i seem to be just repeating myself. The shoulder joint is extremly limiting (we should have had it push out instead of push in) so you have quite a limited range of movement, but nevermind. Have managed to do a couple of different walk cycle today but because of the movement limitations they seem to be changing the timings of the legs as opposed of changing the movement.
I have tried to do what Sarah suggested and have each of the legs come down at a different time but this was incredibly difficult to work out and would cause trouble when it comes to trax. The way i've ben treating the spider is the front legs run at complete opposites of each other and the back legs run in opposites to each other, so to get the legs to come down at different times i offset the back legs all by about 4 frames and it really didnt look right, ive got it saved so i'll show the team when i see them tommorow.
Heres the best cycle i managed.
Then here it is from the side at 75%speed walking (lookin back at it it doesnt look like i've had it cover enough ground)
And walking at about 60% of the speed.
I know the 60% looks a bit jumpy but whatever we do is going to cause basically thr ecomputer is getting rid of frames to speed it up. I really need some input on where to go from here cause i really want to get this out of the way now and just get on with the actual animation.
Monday, 24 November 2008


Sunday, 23 November 2008
Bloody Omaha
Checked out that video recommendation from Rob Jones, not sure if its entirely relevant but its defiantly worth a watch to see how they transformed one environment to look like another with limited resources and time
Obviously this is not the full episode but after a mass search on youtube and on bbc iplayer, the episode seems to have been removed..at any rate its a great example of digital environments.
Obviously this is not the full episode but after a mass search on youtube and on bbc iplayer, the episode seems to have been removed..at any rate its a great example of digital environments.
Spider Vision?
Just couple of videos I've been recommended to watch via my gaming mad brother that could influence the look of spider vision for our piece.
First is from metroid prime, a possible example of the computer set up view of our dear spidey. Interesting colour concept (though maybe we want to go with red to match the spider eye) as well as icons etc.
Second video is from Bioshock as is the view from the view of Big Daddys (please ignore the idiot talking whilst hes playing, i couldnt find a better video to display this view point) Anyway, the view gives a nice warped fish eye lens that we might want to consider for our piece.
Street Liiiiiiife!
So guys, after a mass of model model model the street is finally composed so I thought I'd post some screen prints so we could all see what we've produced over the last few weeks. Everyone has worked very hard and its given the group a great basis for the scene and Im sure were all looking forward to seeing it textured, lit and animation added. I hope these images will show just what we can achieve and spur us all on in the coming weeks with the next stages. Well done everyone! 


 The complete street file is saved on:


 The complete street file is saved on:
- Matt's laptop
- Sarah's latop and external hard drive
- Dan's Mac and external hard drive for ultimate safety.
Saturday, 22 November 2008
A Problem Halved...
Thought i'd let you all know since having the complete maya scene file, i've braved the unknown and gone through the outliner and cleaned it up quite a bit. The file has now gone from roughly 30 mb to 15 mb so quite a difference!! Will help loads when animating and applying textures...
Wednesday, 19 November 2008

calling the shots...
Just a quick post to list the shots we'd like to include in the flythrough sequence. Further shots and the final order are being established our head of story *drum roll please* Khalid!
So here's what we have so far (in no particular order)...
- Spider emerging out of the shadows from underneath a car (red eye visible through darkness)
- INTERACTION SHOT - spider rolling can
- INTERACTION SHOT - spiders crawling out and knocking bin over (need to consider angle for what and how much rubbish falls out
- Low angle shot looking up at the buildings destroyed (could cut to spiders looking up)
- Overhead (though not actually directly overhead, point of interest in buildings) with spiders walking past/up road (building sign swinging?)
- Spider crawling over rubble, slips/loses footing and knocks further rubble over OR spider walking over drain and slips down gap (not falls through though) have them picking themselves back up.
- INTERACTION SHOT - spiders touching/scanning lamppost causing its lights to flicker/go on...possible electrocution?
- C/U of a spider as the other spider crawls towards it
When shots are finalised the list will be updated, possible camera shots/pre-vis blocking/drawings added too if time permits.
Friday, 14 November 2008
When in doubt consult rednecks!
Heres that tutorial i was telling you (sarah+dan) about earlier. I havnt had time to try it myself yet, but if it work i imagine it will save us loads of time.
And this guy has a REALLY bad south american accent...
http://uk.youtube.com/watch?v=2Rra0iISZ5I
And this guy has a REALLY bad south american accent...
http://uk.youtube.com/watch?v=2Rra0iISZ5I
Thursday, 13 November 2008
Rubble
Had a quick go using Dans technique (painting object on a surface) and i think we got a winning method.

This is one block duplicated using the brush tool then i went in and manually rotated the blocks and moved them about. It still needs work, there are too many straight edges but thats because of the block i used. What u guys think?
Wednesday, 12 November 2008
Rubble Trouble
I'm gonna try out Yaniv's method of creating the rubble with a mel script, but for now in regards to matt's recent SOS call, thought I would post this link of a Maya tutorial I found:
http://en.9jcg.com/comm_pages/blog_content-art-113.htm
Painting objects on surfaces:
Firstly, you'll need to activate geometryPaint, so go Modify>Script Paint Tool options. On the Setup panel, type "geometryPaint" into the "Tool Setup Cmd" text field.
Then a pop up window will appear, type in the object you wish to paint (in the geometry box). Close this window. For example, I created a basic sphere so 'psphere1'.
Select the surface you wish to paint on, then click the small icon (Paint Scripts Tool) on the bottom left of your screen to re-invoke the tool.
Start painting the surface. If you want to change the settings of the brush, double click the same icon as before.
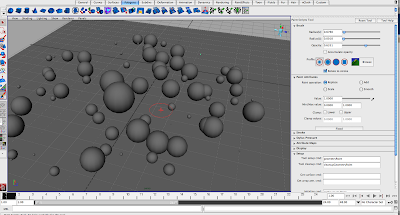
I haven't really experimented with this method, it seems to create random results. Im not too sure what potential it has, but its worth exploring it more...
Saturday, 8 November 2008
There's a MEL script to randomize keys on the graph editor. This might be an effective way to creatbe rubble
Modelling done


Hey, my part of the modelling is done, unless there's something you feel needs to be improved on.
 I'm exploring lighting and texturing today, so I'll be able to be of assistance on that front.
Subscribe to:
Posts (Atom)